

Spark Machine Learning Pipelines: Make Real-Time ML Possible with MLeap on AWS
Explore Spark ML pipelines and how MLeap, a serialization engine with AWS services like EMR and SageMaker endpoints, can make real-time ML possible.


Table of contents
- 🔧 Accessing and using Apache Spark
- 🧑🏽💻 Installing Spark locally
- ♾️ Installing on Google Colab
- 🧱 Databricks
- ☁️ Running Spark on Cloud Platforms
- 🧑🏽🔧Developing and deploying a machine learning pipeline with Spark
If you have used Apache Spark for machine learning, one challenge you may have faced is that the current ecosystem is optimized for batch inference workloads, not real-time inference processing. This can be a bummer if your use case requires low-latency, real-time inference processing.
Of course, there are use-case designs with Apache Spark that can enable real-time processing pipelines for applications. But when it comes to ML pipelines, you need an engine that'll make it efficient to serialize your pipeline (transformations, models) for real-time scoring.
To address this need, this article will explore Spark machine learning pipelines and how MLeap, a serialization engine combined with AWS services like EMR and SageMaker endpoints, can make real-time ML inference processing possible.
This is the second of two articles in this series. The first article provided a comprehensive guide to help you understand the core concepts of building machine learning pipelines with Spark, including the ecosystem, components, and challenges.
In this article, you will learn:
How to build and deploy a machine learning pipeline with PySpark on Amazon EMR,
Serialize the pipeline with MLeap to run in real-time,
Serve the pipeline through an Amazon SageMaker endpoint.
🔧 Accessing and using Apache Spark
Spark was originally written in Scala and supports other programming languages such as Java, Python, and even R, covering many languages used to process big data and perform analytics. In this guide, you will build an ML pipeline with Python.
You can run Spark almost anywhere, from cloud platforms to hybrid platforms.
🧑🏽💻 Installing Spark locally
You can install Spark locally through PySpark with Jupyter Notebook access on:
♾️ Installing on Google Colab
You can also run Spark on Google Colaboratory. A notebook for setting up Spark in Colab with instructions can be found in this repository, alongside the code to develop the ML pipeline.
🧱 Databricks
Another way to get up and running with Spark is through Databricks, whose founders are, in fact, part of the project's creators. Databricks is a cloud-managed platform for running Spark and provides a way to use Spark without worrying about managing dependencies and other complex configurations.
☁️ Running Spark on Cloud Platforms
You can also run Spark on Cloud platforms such as:
In this guide, you will build the Spark ML pipeline on Amazon Elastic MapReduce (EMR), as it is easy to set up, low-cost (on a pay-as-you-go basis), elastic, and integrated with SageMaker to serve the pipeline in production.
EMR is a service that lets you efficiently run and scale Hadoop clusters in your AWS environment. It integrates with many essential AWS services and enables a broad set of Big Data use cases. With EMR, you can:
Create and scale-managed clusters of EC2 instances,
Run applications based on Spark, HBase, MapReduce, and other programming frameworks and engines for Big Data applications.
🧑🏽🔧Developing and deploying a machine learning pipeline with Spark
In this section, you will build and deploy an ML pipeline with Spark. Before creating and deploying the pipeline, let’s understand the problem we are trying to solve and the data available.
🔎 Understanding the problem
An organization seeks a new marketing opportunity with a newly released product. They realize they could target a segment of their users above a certain income level with marketing ads, increasing the likelihood that the customer will purchase the product.
The team suggests you build an application to integrate with the existing marketing tool to send relevant emails to customers designed by the marketing team.
A dataset on prior customers and their income levels is available to explore and use to build the ML application.
From the description, the problem does seem like a classification problem. It will be further confirmed when you explore the dataset.
💻 Setting up the environment
Requirements:
To follow along with this guide, you need to have the following:
An active AWS account. You can create one for free here.
Recommended but not required: Basic knowledge of AWS.
Now, create an Amazon EMR cluster. Use Livy to connect a SageMaker notebook instance to the cluster and develop and run our pipeline for the notebook. You can learn more about setting up the cluster in this article.
🪣 Create an Amazon EMR Cluster
Go to the Amazon EMR management console, sign in to your AWS console, and search for EMR. You should see a page similar to the one below.

(1) Ensure that you are in the appropriate region.
(2) Click on “Clusters”.
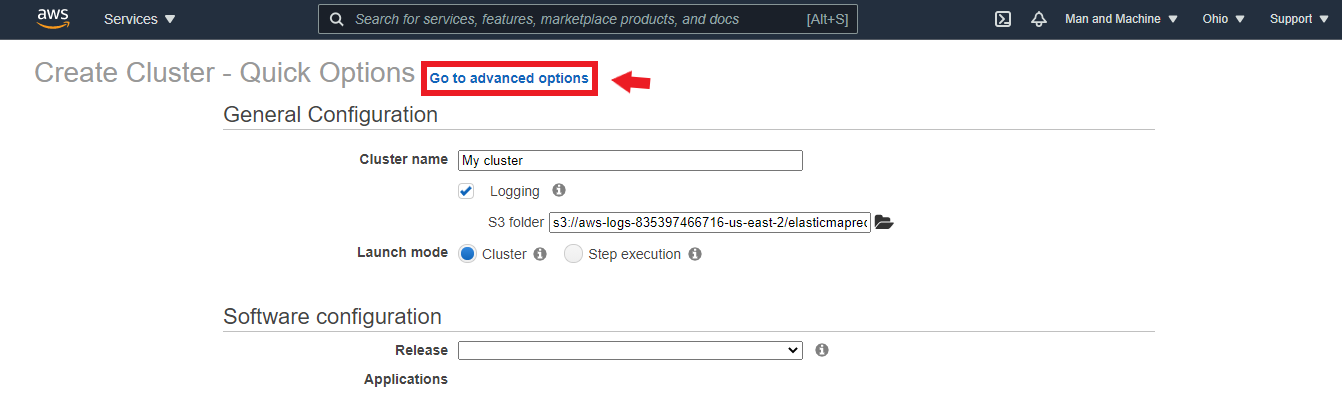
(3) Click on “Create Cluster”. You’ll see a page similar to the one below. Click on “Go to advanced options”.
Now configure the software with the following:
Release: emr-5.23.0 (You can choose a newer release that serves your application).
- Select only the Spark 2.4.0 and Livy 0.5.0 applications.
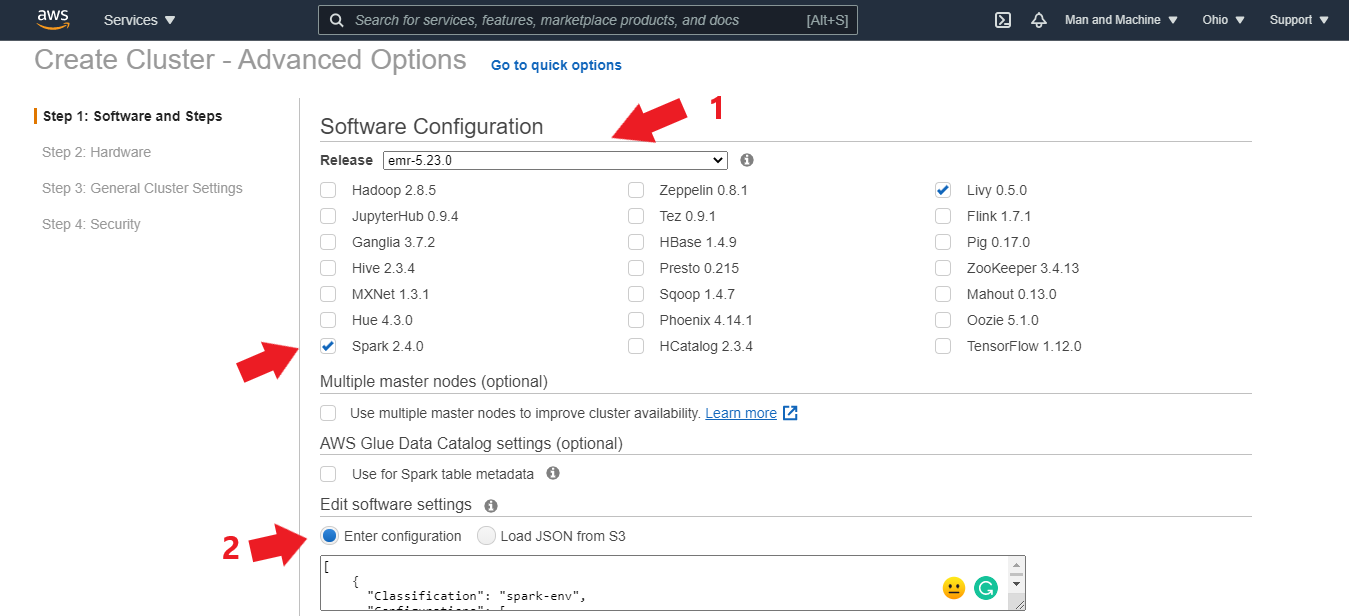
Under the Edit software settings option, select Enter configuration and enter the configuration below to set up PySpark in a Python 3 environment and configure the spark-mleap packages as the default for the Spark shell: (You can also find it in this repository.)
[
    {
      "Classification": "spark-env",
      "Configurations": [
        {
          "Classification": "export",
          "Properties": {
            "PYSPARK_PYTHON": "/usr/bin/python3"
          }
        }
      ]
    },
    {
      "Classification": "yarn-env",
      "Properties": {},
      "Configurations": [
        {
          "Classification": "export",
          "Properties": {
            "PYSPARK_PYTHON": "/usr/bin/python3"
          }
        }
      ]
    },
    {
        "Classification": "spark-defaults",
        "Properties": {
            "spark.jars.packages": "ml.combust.mleap:mleap-spark_2.11:0.15.0"
        }
    }
]
Click on Next to move to the next step, where you will configure the hardware.
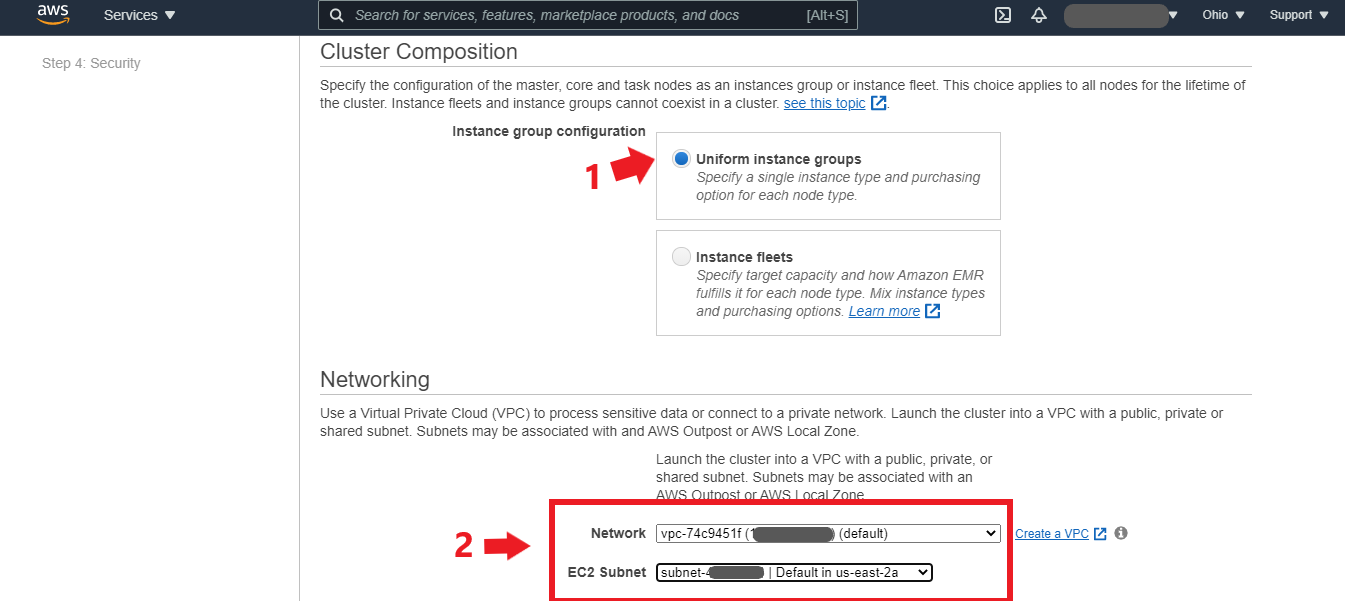
(1) Ensure “Uniform instance groups” is selected.
(2) Under “Networking,” you can select the AWS-created default VPC and EC2 subnet or create a new VPC to secure your resources for this project.
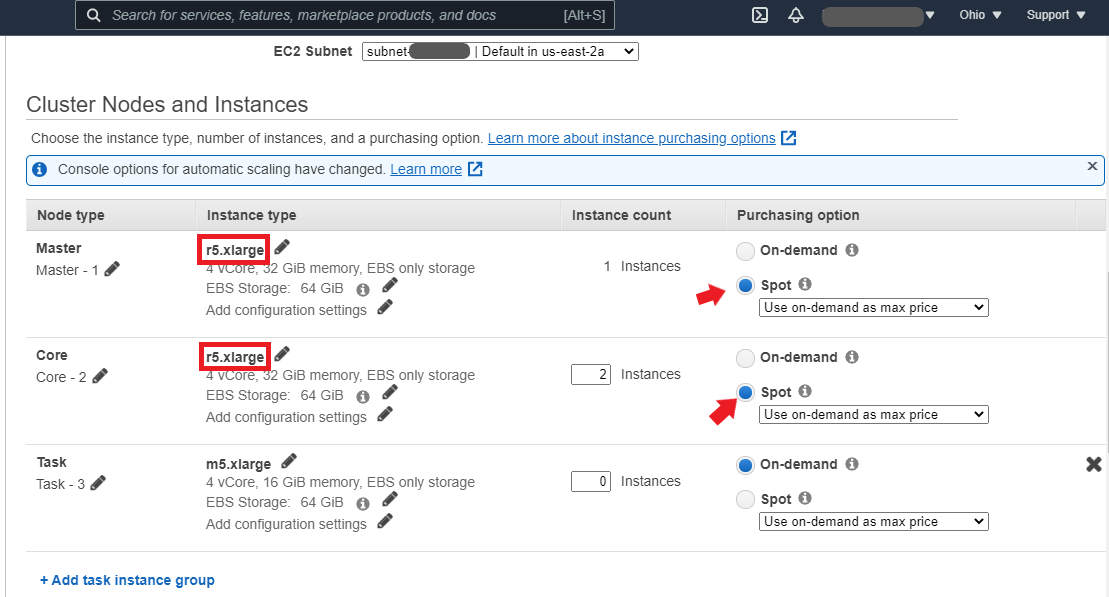
Go to the “Cluster Nodes and Instances” section to select the instance type you want to use for the Master and Core nodes only. According to the pricing calculator, the r5.xlarge EC2 instance type (which should cost around $0.57 in the us-east-2 region for a 3-hour usage) is selected because it is optimized for in-memory computing. Still, you can opt-in for the default m5.xlarge instance. To save costs, select “Spot” for both nodes to access spot instances.
Click “Next” to go to “General Cluster Settings.” Enter your cluster name and ensure “Logging,” “Debugging,” and “Termination protection” are all selected. You can leave the default S3 bucket created for the logs unless you have an in-house bucket you use for logging (you can choose that one instead).

Under the “Additional Options” section, select the “Bootstrap Actions” drop-down arrow. Before clicking the “Add bootstrap action” option, head to S3 to create a new bucket for a bootstrap script found in this repository. Here’s what the bootstrap_actions.sh script contains:
#!/bin/bash

#### WARNING #####
## After modifying this script you have to push it on s3

sudo python3 -m pip install Cython pip

sudo python3 -m pip install boto3 pandas scikit-learn sagemaker matplotlib

# Download the JAR (it is an assembly/fat JAR) file into the /usr/lib/spark/jars/ path for all nodes
wget -q https://s3-us-west-2.amazonaws.com/sparkml-mleap/0.9.6/jar/mleap_spark_assembly.jar -P /usr/lib/spark/jars/

sudo python3 -m pip install mleap

sudo python3 -m pip install pandas==1.1.5
📝 Note:
As of this writing, there’s a bug with installing Pandas on an EMR (Spark) cluster as it is incompatible with the NumPy version that is pre-loaded in the cluster. This issue may have been resolved when you read this guide. This guide does not make use of Pandas.
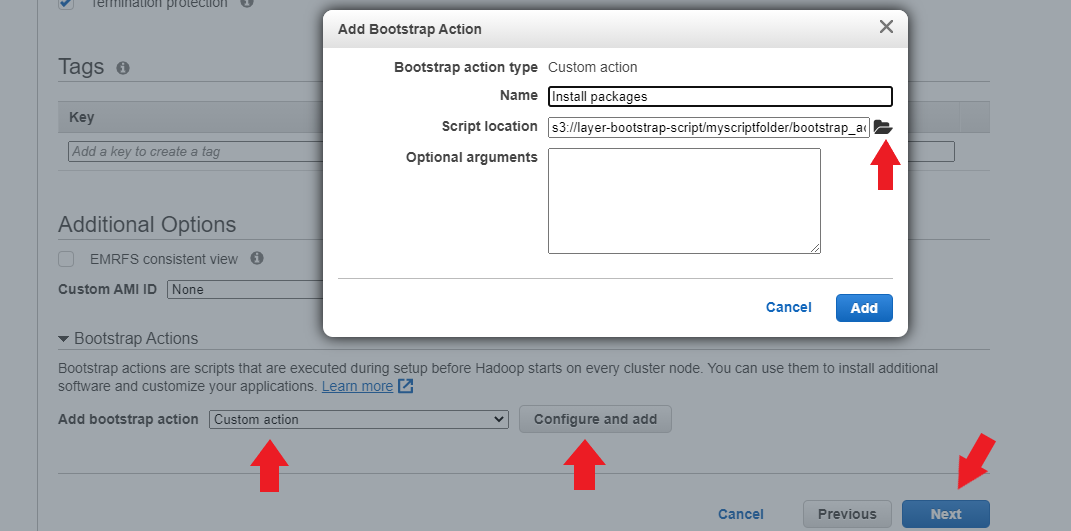
Once you have uploaded the script to an S3 bucket, return to the EMR console, and under the “Add bootstrap action” option, select “Custom action,” then click on “Configure and add.” A dialogue box will pop up; you can optionally rename this action to “Custom action.” Select the script location (your script's S3 URI path), click “Add,” and then click “Next.”
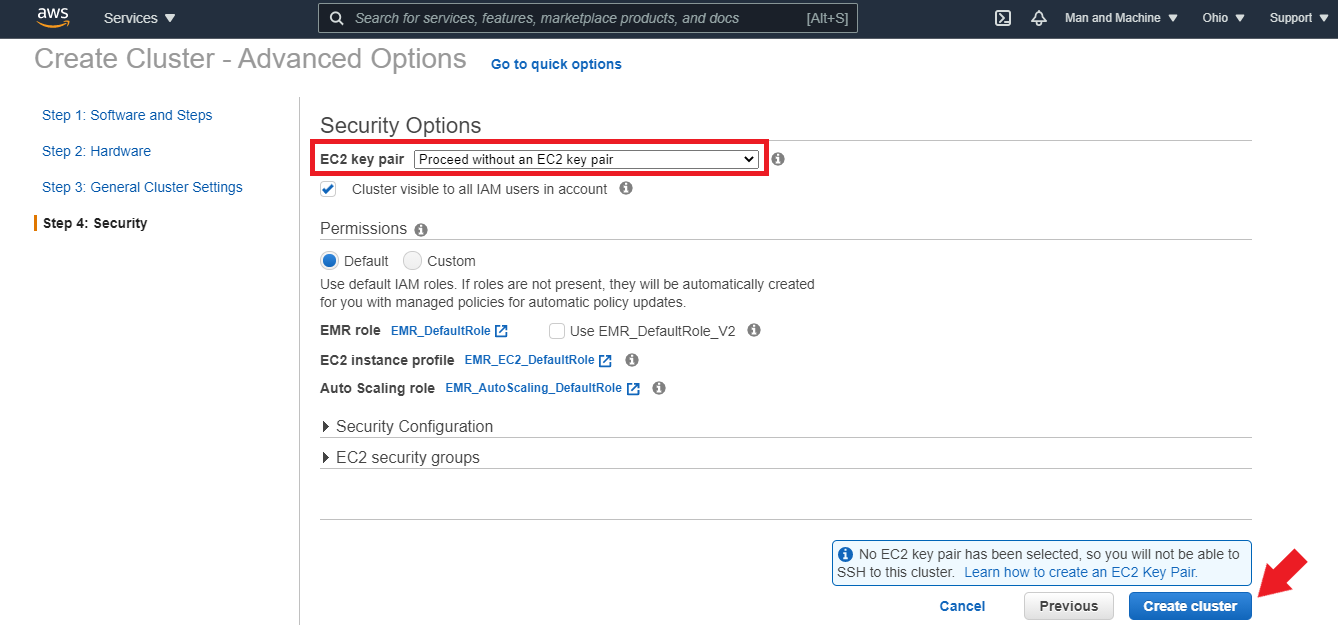
Under “Security Options,” if you want to SSH into the master node of the Amazon EMR cluster, you can select an existing EC2 key pair or create a new one. We will proceed without an EC2 key pair for this guide as there will not be a need to SSH. Leave the other options as default and click “Create Cluster.”
EMR should now be setting up your cluster, and the status should read “Starting”. It could take a few minutes to complete. Once the cluster is created, you should see “Waiting Cluster ready after last step completed.” Choose the Hardware tab.
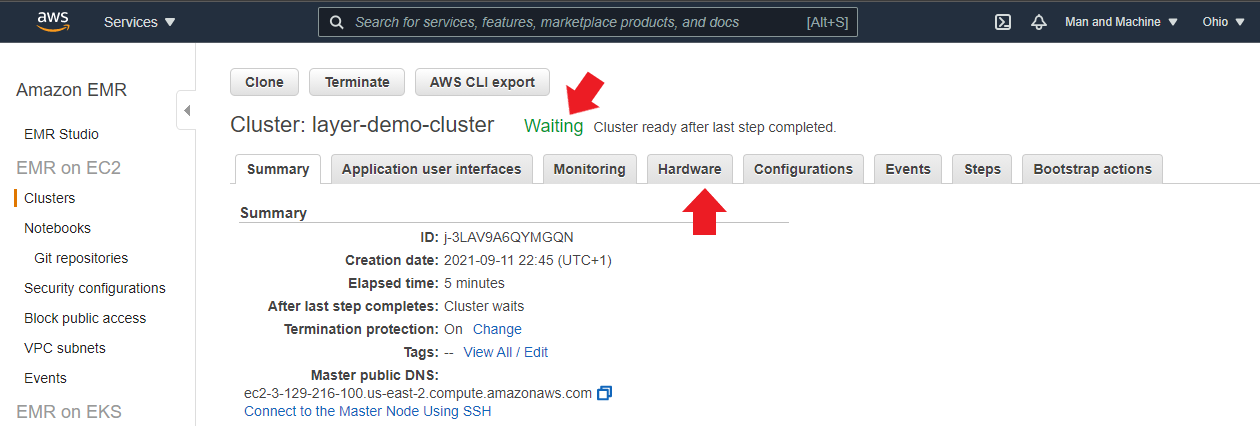
If the Status still shows “Bootstrapping,” click the refresh icon.
Choose the ID for your master node (Master-1), then scroll right to find Private IP Address. Copy the address and save it for later, as you will use it to connect your Notebook instance to your cluster.
🛡️ Set up security groups and open ports
Next, you need to:
Set up a security group and open the relevant ports so that the Amazon SageMaker notebook instance you will create can connect to the Spark cluster via Livy on port
8998.Set up a SageMaker notebook so you can write your pipeline code.
Connect the notebook to Amazon EMR so you can run the pipeline code.
These steps have already been covered in detail in this blog post we referenced earlier; follow the steps there. Once you run %%info in a notebook cell and see the output below, you are good to go!

If it does not display that output or it shows "An error was encountered:
Error sending HTTP request and maximum retry encountered.", ensure you followed the instructions under “Connect the notebook to Amazon EMR” correctly.
🧑🏽🔧 Developing the ML pipeline
Here’s a look at the architecture of the pipeline you are going to develop:

Developing an ML Pipeline with Spark. You have DataFrames, Transformers, Estimators, and Evaluators. | Source: Author.
Find the pipeline code in this notebook. This guide only highlights the most important aspects of the pipeline code.
📑 DataFrames
Data Ingestion
In creating a DataFrame, data must be ingested into the workspace. Ingestion could be from an existing data pipeline with ETL operations done in AWS Glue for Big Data use cases or other storage locations. In this guide, you'll load data directly from an S3 storage bucket and create a DataFrame.
# Load data from a public S3 bucket using the object URI
# The data does not include a header
# Also, the leading whitespace for each value needs to be removed
rawData = spark.read.format('csv') \
                .option('header', 'false') \
                .option('ignoreLeadingWhiteSpace', 'true') \
                .load('s3://layer-guide/dataset/adult-dataset.csv')
Your bucket does not have to be public. This bucket was made public for the sake of this guide.
Create a DataFrame with the .toDF() function and specify the correct order of the features and labels:
dataset = rawData.toDF('Age',
               'WorkClass',
               'FnlWgt',
               'Education',
               'EducationNum',
               'MaritalStatus',
               'Occupation',
               'Relationship',
               'Race',
               'Gender',
               'CapitalGain',
               'CapitalLoss',
               'HoursPerWeek',
               'NativeCountry',
               'Income'
                )
Data validation
You can validate the data by counting the entire number of observations and printing the schema of the data:
# Using `.count()` is inefficient for large datasets.
dataset.count()

print(f'Total Columns: {len(dataset.dtypes)}')
dataset.printSchema()
Data preparation
To prepare the data, drop the 'FnlWgt' feature, which does not seem to be useful for this problem:
dataset = dataset.drop('FnlWgt')
In this data, missing values are represented with '?’. To take care of missing values, convert them to NaN values.
dataset = dataset.replace('?', None)
While there are different ways to deal with missing values in your dataset, drop them in this guide:
dataset = dataset.dropna(how='any')
The next step is to convert the target columns from strings to binary labels. While you could efficiently do this with a transformer (such as StringIndexer), it will also cause schema complications when you serialize your model—the trade-off is worth it on this one.
If a customer earns >50K, it is encoded as 1, and if they make <=50K, it is 0.
mapping= {
        '<=50K': '0',
        '>50K': '1'
    }
dataset = dataset.replace(to_replace=mapping, subset=['Income'])
Looking at the data schema, you will find that some numeric columns are encoded with a string data type. To fix this, you will cast them to a DoubleType() data type for a more precise numeric representation.
dataset = dataset.withColumn('Age',
                             dataset['Age'].cast(DoubleType()))
dataset = dataset.withColumn('EducationNum',
                             dataset['EducationNum'].cast(DoubleType()))
dataset = dataset.withColumn('CapitalGain',
                             dataset['CapitalGain'].cast(DoubleType()))
dataset = dataset.withColumn('CapitalLoss',
                             dataset['CapitalLoss'].cast(DoubleType()))
dataset = dataset.withColumn('HoursPerWeek',
                             dataset['HoursPerWeek'].cast(DoubleType()))
dataset = dataset.withColumn('Income',
                             dataset['Income'].cast(DoubleType()))

dataset.limit(10).show()
Data segregation
Before transforming the features, split the data into training and test sets.
(trainingData, testData) = dataset.randomSplit([0.8,0.2], seed=42)
🤖 Transformers
Feature transformation
Start by transforming categorical features through indexing and one-hot-encoding them. Select the categorical features in the dataset:
categoricalFeatures = [item[0] for item in dataset.dtypes if \
                     item[1].startswith('string')]

print(categoricalFeatures)
Create an indexer to convert the categorical values to indices using StringIndexer():
indexers = [StringIndexer(
    inputCol=column,
    outputCol=column + '_index',
    handleInvalid='keep') for column in categoricalFeatures]
Create an array of OneHotEncoders to encode the categorical values. OneHotEncoderEstimator() here because the OneHotEncoder() transformer is not compatible with MLeap (which will be used to serialize the pipeline) as of the time of this writing.
encoders = [OneHotEncoderEstimator(
    inputCols=[column + '_index'],
    outputCols= [column + '_encoded']) for column in categoricalFeatures]
It's time to transform the numerical features. You can experiment with this by working with scaled and unscaled data. This guide scales the numeric values with the MinMaxScaler(). Select numeric features:
numFeatures = [item[0] for item in dataset.dtypes \
               if item[1].startswith('double')]

# Only select features for scaling; not label
numFeatures = numFeatures[:-1]

print(numFeatures)
To successfully scale the data, convert it to vector features and apply MinMaxScaler() to the columns.
vectorFeatures = [VectorAssembler(inputCols=[col], \
                                  outputCol=col + "_vec") for col in numFeatures]

numScaler = [MinMaxScaler(
    inputCol= column + "_vec",
    outputCol= column + '_scaled') for column in numFeatures]
See the notebook for how the requiredFeatures were derived. Select and convert the required features into a single feature vector using VectorAssembler() for training ML models.
assembler = VectorAssembler(inputCols=requiredFeatures, outputCol='features')
🔮 Estimators
Selecting model estimators
For this guide, the GBTClassifier() was selected, but if you follow the notebook, you will realize you can experiment with other estimators.
gbt = GBTClassifier(labelCol="Income", featuresCol="features")
🛠️ Model training
To train the model, define a pipeline containing the order of the feature transformers and concatenate them with the single feature vector the model will be trained on. This pipeline will form the basis for transforming and predicting new data in production.
pipeline_gbt = Pipeline(
    stages=indexers + encoders + vectorFeatures +  numScaler \
     + [assembler, gbt]
)
🔧 Hyperparameter tuning
To tune the hyperparameters, you can define a hyperparameter grid for the model estimator:
paramGrid_gbt = ParamGridBuilder().addGrid(
    gbt.maxDepth, [5, 10, 15]).addGrid(
    gbt.maxIter, [20, 25, 50]).build()
CrossValidator() is a good estimator for performing k-fold cross-validation on your dataset. It takes the pipeline, a defined model evaluator, and the parameters you want for building the model.
To use CrossValidator(), you must define a model evaluator and, in this case, a MulticlassClassificationEvaluator() (you can also decide to use BinaryClassificationEvaluator()).
The target “Income” is passed as the label, and the model estimator generates predictions based on the input data, which the evaluator evaluates.
evaluator = MulticlassClassificationEvaluator(
    labelCol='Income',
    predictionCol='prediction',
    metricName='accuracy')
Define the CrossValidator() estimator:
crossVal = CrossValidator(estimator=pipeline_gbt,
                          estimatorParamMaps=paramGrid_gbt,
                          evaluator=evaluator,
                          numFolds=3)
Since it's an estimator, you can call .fit() on the training data:
model_gbt = crossVal.fit(trainingData)
model_gbt is now a learned model that’s also a transformer and can be used to predict the training and test sets to evaluate model performance:
# Predict training data to evaluate the performance
predictions_train = model_gbt.transform(trainingData)

# Predict training data to evaluate the performance
predictions = model_gbt.transform(testData)
🔬 Evaluators
Model evaluation
accuracy_train = evaluator.evaluate(predictions_train)
accuracy_test = evaluator.evaluate(predictions)
print('Train Accuracy = ', accuracy_train)
print('Test Accuracy = ', accuracy_test)
Comparing your training and test accuracies can give you an idea of whether your model is overfitting.
📦 Model packaging
As mentioned earlier, packaging Spark ML Pipelines requires custom serializers. In this guide, you’ll use MLeap to serialize the Spark ML pipeline, as it provides an easy-to-use pipeline serialization format and execution engine for our online inference.
Use MLeap’s SimpleSparkSerializer() for this operation:
SimpleSparkSerializer().serializeToBundle(
    model, "jar:file:/tmp/model.zip", predictions
)
To deploy the model to SageMaker, it has to be in .tar.gz format, but MLeap produces the model in .zip format.
# Unzip the model artifacts and store it in tar.gz format.

import zipfile

with zipfile.ZipFile("/tmp/model.zip") as zf:
    zf.extractall("/tmp/model")

import tarfile

with tarfile.open("/tmp/model.tar.gz", "w:gz") as tar:
    tar.add("/tmp/model/bundle.json", arcname="bundle.json")
    tar.add("/tmp/model/root", arcname="root")
Upload to an S3 bucket... Change folder and file names if needed:
s3 = boto3.resource("s3")
file_name = os.path.join("emr/sparkml-layer/mleap", "model.tar.gz")
s3.Bucket("layer-bootstrap-script").upload_file("/tmp/model.tar.gz", file_name)
Check out this notebook to see how the MLeap serializer was used for packaging the pipeline for deployment.
🚀 Deploying the ML Pipeline
Here’s a look at the basic deployment architecture:
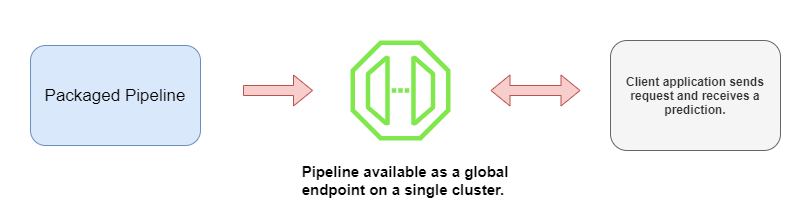
Deploying a Spark ML pipeline. | Source: Author.
Spark ML Pipelines can only run on the Spark runtime. With SageMaker, you can serve inference endpoints to the pipeline, and MLeap can provide the execution engine for the pipeline.
Ensure you set the region to deploy the pipeline on AWS. Replace the <ENTER YOUR REGION HERE> placeholder:
os.environ["AWS_DEFAULT_REGION"] = '<ENTER YOUR REGION HERE>'
Define the raw data schema with the code in the notebook and use the code below to deploy the pipeline. Ensure you replace the <ENTER YOUR BUCKET NAME> placeholder:
from time import gmtime, strftime
import time

timestamp_prefix = strftime("%Y-%m-%d-%H-%M-%S", gmtime())

import sagemaker
from sagemaker import get_execution_role
from sagemaker.sparkml.model import SparkMLModel

sess = sagemaker.Session()
role = get_execution_role()

# S3 location of where you uploaded your trained and serialized SparkML model
sparkml_data = "s3://{}/{}/{}".format(
    "<ENTER YOUR BUCKET NAME>", "emr/sparkml-layer/mleap", "model.tar.gz"
)
model_name = "sparkml-layer-" + timestamp_prefix
sparkml_model = SparkMLModel(
    model_data=sparkml_data,
    role=role,
    sagemaker_session=sess,
    name=model_name,
    # passing the schema defined above by using an environment
    # variable that sagemaker-sparkml-serving understands
    env={"SAGEMAKER_SPARKML_SCHEMA": schema_json},
)

endpoint_name = "sparkml-layer-ep-" + timestamp_prefix

# You can deploy to multiple instances for high availability and distributed ML
sparkml_model.deploy(
    initial_instance_count=1, instance_type="ml.c4.xlarge", endpoint_name=endpoint_name
)
If the pipeline has been deployed, you should see a similar output:

You can find the complete code for deploying and testing the pipeline in this notebook.
📲 Calling deployed pipeline from an application
Once your pipeline has been deployed with an accessible endpoint and tested, you can call it from your application. In this case, a small Python program passes some data to the endpoint using SageMaker’s invoke_endpoint() function. Learn how to set up boto3 on your server or machine in this quickstart guide.
Here’s the Python program that sends data for prediction:
import boto3
import json

client = boto3.client('sagemaker-runtime')

endpoint_name = "<ENTER YOUR ENDPOINT NAME>"
content_type = "text/csv"
accept = "text/csv"

# Data to be sent for prediction (follows pre-defined schema)
payload =  "17.0, Local-gov, 10th, 6.0, Never-married, Protective-serv, \
            Own-child, White, Female, 0.0, 1602.0, 40.0, United-States"

# For the payload, you can also load a CSV containing the data you want to predict on.
response = client.invoke_endpoint(
    EndpointName=endpoint_name,
    ContentType=content_type,
    Accept=accept,
    Body=payload
    )

result = json.loads(response['Body'].read().decode()) # Decode the prediction from a binary object

if result == 1.0:
    print("Customer's income is greater than $50k per year.")
elif result == 0.0:
    print("Customer's income is lesser than or equivalent to $50k per year.")
Running this returned the following result for this pipeline:
Customer's income is lesser than or equivalent to $50k per year.
Clean up your workspace by deleting your endpoint with the code below, so you do not incur the cost of keeping it running:
boto_session = sess.boto_session
sm_client = boto_session.client("sagemaker")
sm_client.delete_endpoint(EndpointName=endpoint_name)
Also, delete your running cluster and stop your notebook instance from running.
🙌🏽 Next steps and MLOps
Congratulations! You have now built, deployed, and called a Spark ML Pipeline. What’s next, you might ask? Cue MLOps! Serving your model is one thing; another challenge is to operationalize it. SageMaker, through SageMaker Workflows, offers a suite of MLOps tools in model monitoring, management, and governance.
You can also secure your pipeline endpoint using the Amazon API Gateway. This blog post teaches how to create and secure an ML-powered REST API endpoint with API Gateway.